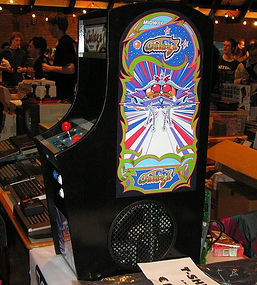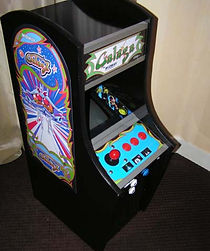
On the retro-event in Apeldoorn I got inspired to build a small mame cabinet when i saw Pepijn's Ms Pacman cabinet. Pepijn did a great job. Galaga was my favourite and the art looked cool too, so that would be my project!
Update [febr'06]
I got a broken Compaq IPAQ PIII 800 for free. The harddisk was broken, and a swap of my HD from my Mame setup didn't work. I upgraded my old board with an extra 128 Mb and I swapped the processor. Hardware specs: PIII Celeron 800mhz, 256MB, 8GB HD.
Step 1 - getting the hardware [sept'05]
I searched to get a decent 9" SVGA monitor, and PIII machine. I bought two monitors (one spare), and a Compaq IPAQ PIII 500mhz, 128Mb, 8GB. Ofcourse not all cables where included (I always forget to ask for cables when i make a deal!). Bought an old keyboard, so i can configure the pc more easily (so i don't have to disconnect our home pc when i work on the Mame-machine). The buttons and joystick where ordered from www.ultimarc.com. I bought a control-2-pc connector on ebay.
Step 2 - planning and starting [sept'05]
I am still waiting for the connector, I have started to configure the PC. It's running on Windows XP Pro, and has Mame32 and GLaunch, and ofcourse a few roms. GLaunch and Mame can easily be rotated to vertical view.
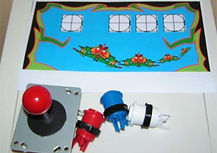
I have printed a test page for the control layout. When the connector arrives i will first make a test-controller to see if it works. I still have to start to make a design on paper, but i already have the dimensions of a 100% Galaga cabinet. I will make a 50% model.
Step 3 - Controller [oct'05]
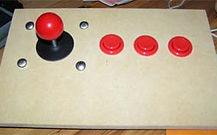
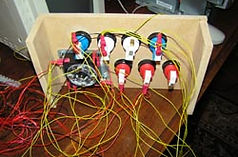
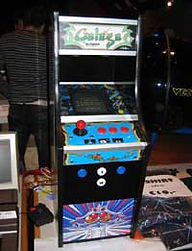
First part is making the controller, so i can test it before it is part of the cabinet. If the buttons are too far apart, I can easily make a new board. The connector did arrive, so i could connect everything and try it. After a few corrections to the connections, it worked. The credit, P1, P2 and esc. button will be placed on the cabinet front (the place of the coin door).
P1 & P2 couldn't be placed next to each other, because when the figures on the button where rotated, I couldn't connect the microswitch to the cables. I wonder if I missed something, but i couldn't turn them around. I use 7 buttons, action1-3, credit, player 1/2 and esc (which throws you back to the menu). While pressing P1&P2 you can change the volume with the stick. The stick is 4 way & 8 way, but you can only change this setting under the joystick. I have to make sure it still can be reached when the cab is put together. There is a stick avalable which can be changed from the top (didn't check that properly before i ordered the stick).
Step 4 - Monitor [oct'05]
The next part will be to take the monitor apart and screw it to MDF/Wood. As with the controller it will be a test setup, and after i have worked out how it will fit the best way, i will continue to make a complete design on paper. A tip from Pepijn, which i might use: make a cabinet in carton/mdf on a small scale to see if your plans are correct.
Step 5 - For real! [oct/nov '05]
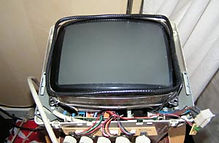
I made a new joystick, and i fitted the monitor to MDF. I don't like monitor's without a cover (high voltage and stuff), so i screwed the back again to the MDF. I have enough MDF for the cabinet now, just not the time to continue. First setback, I used the IBM monitor and fitted it to MDF. I did a test, and liked the other monitor better. Replaced the IBM with the other monitor and ... it was dead. Had to put the IBM back.
I also bought some speaker grills, which will look pretty cool. Also bought a second hand labtec speaker set with subwoofer!
Monitor not quite ready. But looking good already!
Controller in progress for real, without plexiglass and print on plain paper instead of photo paper. Plexiglass is not my favourite material! Change of plan regarding the art on the controller, will cut it in two, maybe i will photoshop it a little more, but this way it's more like the orginal.
I have cut the plexiglass for the controller (ruined one, second was good). In the process I damaged the art for the controller. Will make a new one, then I can glue the parts together (picture above is the finished controller). Again a plexiglass disaster, I put screws in the kickplate, and pressed too hard! Broken kickplate. I am out of plexiglass, so I have to get another plate (another 10 euro learning money). disassembled the Compaq, otherwise it wouldn't fit in the cabinet.
I decided it works best for me to have a global plan but work from part to part and keep measuring, fitting and adjust the plan along the way. Things are going quite well, I will post some pictures this weekend ... The side parts are ready, now i am measuring, sanding the other parts (all parts are still loose, until they are all ready). I connect all parts with deuvels/wooden plugs. I drilled two holes too deep, so I went through a side part (have to fix that). If all parts are good, I have to paint the parts, and then put it together.
I tested the hardware before i would glue the parts together ... Monitor dead !! Argh! I didn't do anything to it after the last test (i think). I will have to find another one or get it fixed. While cursing over my mischiefs, I checked the first monitor again. I thought the end of the tube was broken (well it is), but when pressed together it works! Have to find a way to keep it fixed, but now I can continue! Monitor is working and in place. I will glue the parts together. As you can see I haven't painted the sides yet. On the top you can see I drilled one hole too deep. Have to fix that before I paint the sides. Also used the slot cutter, but putting the t-mold in is one of the last steps. As you can see below, the black paint has a nice shine and reflects like a mirror.
Speakergrills! After playing some games, I am back to the project. I have also been tweaking with XP. With MSConfig I have turned down most processes. Don't know if it helps the performance on mame, but now the PC starts quicker.
Step 6 - T-Molding
To make the cabinet look professional it needs T-Molding. What is T-Molding? A plastic border for the edge of the MDF. You can buy T-Mold at www.t-molding.com. For 18mm MDF you need 11/16". The more common 3/4" is 19mm. I had to buy a "Slot Cutter" which is expensive!! (Euro 38). With the right tools it's easy, to adjust it to be cut in the middle of the mdf it is wise to first use a piece of mdf to test if the cut is straight in the middle. Do this OUTSIDE the house! It's a messy job.
Step 7 - Art
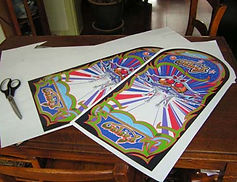
What bugs me is that the art for Galaga uses different color schemes. So the colors don't match (green of the marquee is different from the sideart and control panel, kickplate is more purple then the sideart, which is blue, etc.) I could use a A4 color laser printer from work, and a friend used his A3 color printer for the bezel. I have a print of the sideart as well (taped together 3xA4), but I am also checking prices to make a sticker for the sideart. On http://arcadeartlibrary.com/arcade_art/ you can find hi-res pictures. If the download option doens't appear, make an account and it will. I got the sideart on glossy sticker paper for free! A friend had some connections, which helped me a lot.
Step 8 - Playing games
This step can be done through all steps, but then it's called testing!
My mame project 1